Nodejs及expresss框架初探
Nodejs及express框架初探
Nodejs简单介绍
Javascript同样是一门C-like的语言,但是它更加容易上手,因此又跟Python十分类似。Nodejs是一个基于Chrome V8引擎的JavaScript运行环境,大大提高了Javascript的运行效率,从而使Javascript的业务范围从原先的前端向后端衍生,是Javascript成为了与PHP,Python等服务端脚本语言平起平坐的语言。接下来要探讨的Express框架也可以简单理解成和Python中Flask、Django相类似的框架。与Python做类比,可以更好地理解Javascript以及它的一些框架。
需要注意的是:Javascript是编程语言,Nodejs是Javascript的运行环境,Express是与运行在Nodejs下的框架,下文对Nodejs和Javascript不会做明显的区分,有时候也会用Nodejs代指Javascript。
Nodejs的一些特点
回调函数的使用
1 | app.get('/greet/:name', (req, res) => { |
创建了一个打招呼的路由,可以看到app.get()的第二个参数是一个匿名函数。将一个函数作为参数传给另一个函数,这就是一个典型的回调函数的用法,在异步操作结束后会调用这个匿名函数,实现了对对应请求的处理
异步是一种编程模型,它允许在执行某个操作的同时继续执行后续的代码,而不必等待该操作的完成
1 | fs.readFile('file.txt', 'utf8', function(err, data) { |
另一个读取文件的例子
异步的概念主要出现在需要等待的操作,比如网络请求、文件读写、数据库查询等。在传统的同步编程中,这些操作会阻塞程序的执行,直到操作完成才会继续执行下一步。而异步编程通过将这些操作委托给其他系统(比如操作系统、网络模块等)来进行处理,允许程序在等待操作完成的同时执行其他任务
模块导出
1 | // controllers.js |
Nodejs通过module.exports实现模块的导出
1 | // main.js |
在另一个文件中实现模块的导入,可以联想一下Python的import语句
1 | # controllers.py |
翻译成Python就是这样,是不是很像?所以Nodejs同样也挺简单的
npm
Nodejs特有的包管理器,类似于Python的pip
1 | npm install ... |
项目文件夹下的node_modules和package.json
- node_modules:存放安装的第三方包,类似Python的虚拟环境,直接把包安装在了项目文件夹下,而不是全局包
- package.json: 像Python项目的requirements.txt?声明了项目所依赖的包
原型链(难点)
Javascript非常重要的一个点,在CTF比赛中,Nodejs相关的题目往往伴随着原型链污染。
分清__proto__和prototype
原型链相关的四个概念两个准则
四个概念
- JavaScript的对象有两种:普通对象和函数对象,所有的对象都有
__proto__属性,但是只有函数对象有prototype属性 - 属性
__proto__也是一个对象,它有两个属性:__proto__和constructor(构造函数) - 原型对象
prototype有一个默认的constructor属性,用于记录实例由哪个类创建 Object和Function都是Javascript内置的函数对象,使用较多的Array、RegExp、Date、Boolean、Number、String也都是内置的函数对象
两个准则(js之父在设计原型链时所设立的准则)
Person.prototype.constructor == Person准则1:原型对象的construcor的构造函数指向本身person.__proto__ == Person.prototype准则2:实例的__proto__和原型对象指向同一个地方
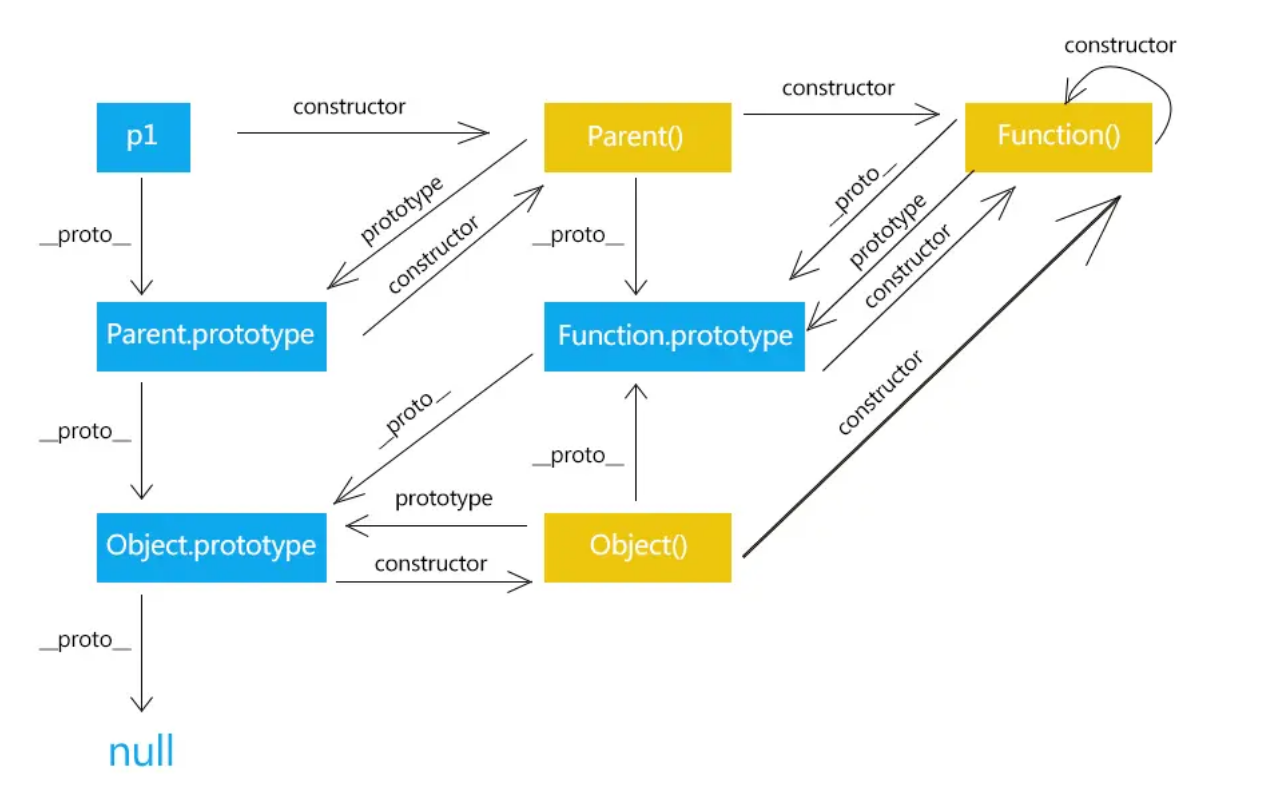
链子的终点
结合上图可以看出__proto__,prototype,constructor都有终点
__proto__的终点是原型对象Object.prototype,而Object.prototype.__proto__ == nullprototype的终点是Function.prototypeconstructor的终点是Function(),体现了上面所说的第四个概念
e.g.
1 | function Person(name, age){ |
需要注意的是,通过prototype创建出来的属性是挂载在原型链上面的,用console.log打印不会直接打印该属性
Javascript通过这种方式实现了类的继承,使用原型链能减少内存的消耗
关于原型链污染,我会在安全专题中继续深入探讨(画个饼)
Express框架初探
上文介绍了一些Nodejs下的特点以及一些语法,本质上和别的编程语言没有太大的差别,接下来就简要探索一下Express框架
简单的Web服务
1 | const express = require("express") |
一个很简单的Web服务demo
首先引入express包,赋值给app对象,一般使用两种常见的HTTP请求方式,GET和POST
(req,res)
通常使用req和res作为回调函数的参数,两者都有许多属性,可以获取并修改HTTP包,下面介绍一些常用的属性
req(HTTP请求对象)
req.url: 获取请求的 URL。req.method: 获取请求的 HTTP 方法(GET、POST、PUT、DELETE 等)。req.params: 获取路由参数,通常用于获取动态路由中的参数。req.query: 获取GET请求字符串参数。req.headers: 获取 HTTP 头部信息。req.body: 获取请求体中的数据,通常用于 POST 请求中的表单数据或 JSON 数据。req.cookies: 获取客户端发送的 Cookie。req.ip: 获取客户端的 IP 地址。req.protocol: 获取请求的协议(http 或 https)
可以看到这些属性都是http包里的参数,更多参数参考官方文档
GET请求
使用req.query即可获取
POST请求
使用req.body获取,但是默认情况下,express不会解析POST请求的请求体(会显示undefined),所以需要依赖中间件来解析请求体,默认情况下使用body-parser
1 | const express = require("express"); |


可以成功解析
res(HTTP响应对象)
res.send(): 发送响应给客户端,通常用于发送文本、HTML、JSON 等数据。res.json(): 发送 JSON 格式的响应给客户端。res.status(): 设置响应的状态码。res.setHeader(): 设置响应头。res.cookie(): 设置响应的 Cookie。res.redirect(): 发送重定向响应给客户端。res.sendFile(): 发送文件给客户端。res.render(): 渲染模板并发送给客户端。
基本都是HTTP响应包的参数
也可以组合使用
1 | res.status(200).json(data); |
重定向
1 | // 重定向 |
下载文件
发送文件需要指定根目录,否则会报错
TypeError: path must be absolute or specify root to res.sendFile
1 | const express = require('express'); |
上传文件
1 | const { v4: uuidv4 } = require('uuid'); |
Ejs模板
可以用Flask的Jinja2模板引擎类比,不过Ejs使用<% %> 和 <%= %>作为模板语句
1 | const ejs = require('ejs'); |
其他重要的中间件
fs模块
Nodejs使用fs模块进行文件操作
- 文件读取和写入:
fs.readFile():用于异步读取文件内容。fs.readFileSync():用于同步读取文件内容。fs.writeFile():用于异步写入文件内容。fs.writeFileSync():用于同步写入文件内容。
- 文件操作:
fs.rename():用于重命名文件或移动文件。fs.unlink():用于删除文件。fs.copyFile():用于复制文件。
- 目录操作:
fs.mkdir():用于创建目录。fs.rmdir():用于删除目录。fs.readdir():用于读取目录内容。
- 文件信息:
fs.stat():用于获取文件或目录的状态信息,如大小、创建时间等。fs.existsSync():用于检查文件或目录是否存在。
- 流操作:
fs.createReadStream():用于创建可读流。fs.createWriteStream():用于创建可写流。
- 其他:
fs.access():用于检查文件或目录的权限。fs.chmod():用于修改文件或目录的权限。fs.watch():用于监视文件或目录的变化。
读取文件
1 | const fs = require('fs'); |
同样使用了回调函数
写文件
1 | const fs = require('fs'); |
child_process模块
Nodejs的另一个核心模块,通常用于执行系统命令
exec
1 | const childProcess = require('child_process'); |
也可以使用Nodejs的语法糖,使用{}从child_process对象中提取exec方法
1 | { exec } = require('child_process'); |
spawn
spawn用于创建一个新的nodejs子进程,它比exec更灵活,可以更好地处理大量输出数据
1 | { spawn } = require('child_process'); |
lodash模块
lodash是一个 JavaScript 实用工具库,提供了许多常用的函数和方法,用于简化开发过程中的数据处理、函数操作、集合迭代、数组操作、对象操作等。lodash中的每个函数都经过优化,具有高性能和可靠性。
map函数
和Python中一样
1 | const _ = require('lodash'); |
groupBy函数
用于分组
1 | const _ = require('lodash'); |
merge函数
与安全最紧密相关的当然是这个merge函数,从这个merge函数衍生出了很多原型链污染的CTF题目
1 | const _ = require('lodash'); |
递归合并了两个数组
1 | const _ = require('lodash'); |
递归合并了两个json对象,保留source中的属性,舍弃object中的属性,新建原先source中没有的属性
1 | // 源码大致就是这个意思 当然这里的source和上面的source相反 |
关于原型链污染,会在安全专题展开讲
Nodejs及expresss框架初探
install_url to use ShareThis. Please set it in _config.yml.